- Преимущества кирпичной бани
- Проекты кирпичных бань
- Строительство кирпичной бани своими руками
- Фундамент кирпичной бани
- Кладка углов
- Кладка стен
- Создание потолка
- Создание крыши
- Утепление, паро- и гидроизоляция бани
- Отделка бани
- Советы по строительству бани из кирпича
- Видео-урок строительства бани из кирпича
- Статья
- Видео
Преимущества кирпичной бани

Кирпичная баня
Как мы уже говорили, преимущество кирпича над оцилиндрованным бревном и профилированным брусом заключается в более высокой прочности и долговечности материала. Помимо этого следует отметить еще одно преимущество кирпичной бани – менее трудоемкий уход за постройкой и более быстрое введение кирпичной бани в эксплуатацию. Последнее связанно с тем, что баня из кирпича не требует усадки, которая обычно проходит в течение года.
Причина, по которой некоторые дачники отдают предпочтение бане из сруба – это якобы меньшая стоимость работ. Но тут мнение противоречиво, т.к. при одном и том же размере и проекте бани, затраты бревна и кирпича будут практически одинаковыми по стоимости.
Что бы вы сами решили, что выгоднее: кирпичная баня либо баня со сруба, предоставляем вашему вниманию данное видео, в котором все подробно анализируется:
Теперь переходим к проектам кирпичных бань.
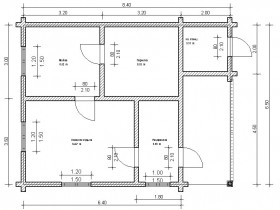
Проекты кирпичных бань
Предоставляем вашему вниманию наиболее популярные проекты бань из кирпича:
-
- Проекты кирпичных бань
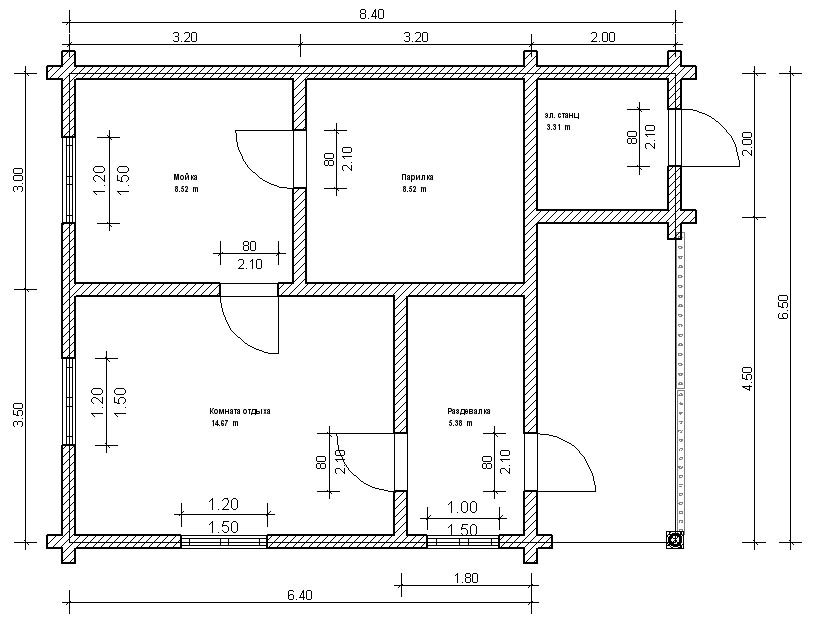
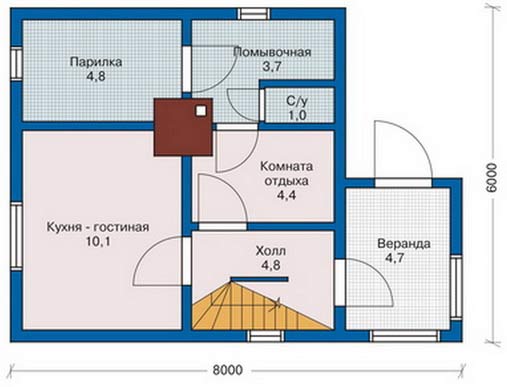

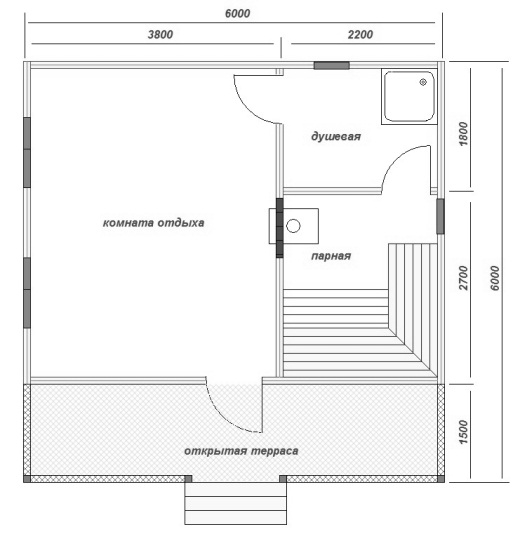
Как вы видите, вариантов множество, поэтому при выборе подходящего проекта кирпичной бани необходимо опираться только на свои вкусы и размер кошелька!
Строительство кирпичной бани своими руками

Строительство кирпичной бани своими руками
Причина, по которой очень сложно описать словами технологию строительства кирпичной бани заключается в том, что в кладке кирпича множество нюансов, которые нужно только видеть глазами. В этом вы сейчас убедитесь, т.к. технология кладки кирпичной бани будет представлена в виде фото и видео-примеров, с небольшим описанием при необходимости.
Для начала разберемся с основными этапами строительства бани из кирпича своими руками, которыми являются:
- Возведение фундамента бани
- Кладка углов
- Кладка стен
- Создание потолка
- Создание крыши
- Тепло- ,паро- и гидроизоляция бани
- Внешняя и внутренняя отделка кирпичной бани
Фундамент кирпичной бани

Фундамент кирпичной бани
Итак, строительство бани из кирпича своими руками начинается с возведения фундамента. Так как кирпичная коробка бани имеет большой вес, фундамент для бани должен обладать высокой прочностью. Лучше всего использовать возведение ленточного фундамента, глубина возведения которого должна находиться ниже уровня промерзания почвы. Более подробно о том, как правильно создать ленточный фундамент для бани, читайте в данной статье. После того, как фундамент бани будет возведен, необходимо тщательно осуществить его гидроизоляцию и приступать к кладке кирпичного короба бани, которая начинается с кладки углов постройки.
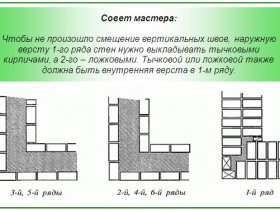
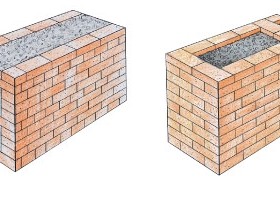
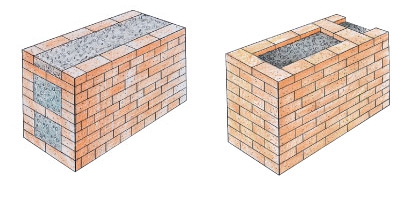
Кладка углов
На защищенный от влаги фундамент необходимо нанести песчано-цементный раствор (в соотношении 2:1) толщиной около 20 мм, на который и будет осуществляться кладка углов бани.
Во время кладки углов необходимо воспользоваться одной из схем кладки кирпича, которые выглядят следующим образом:
-
- Кладка углов
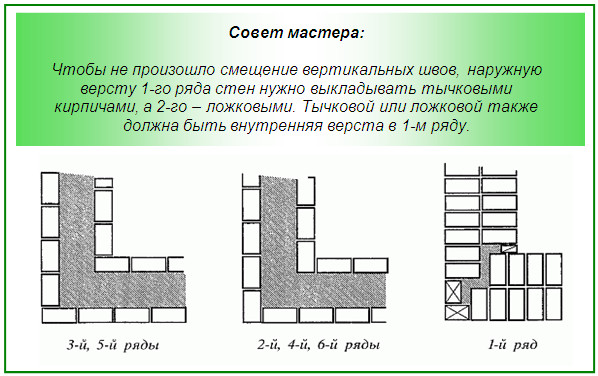
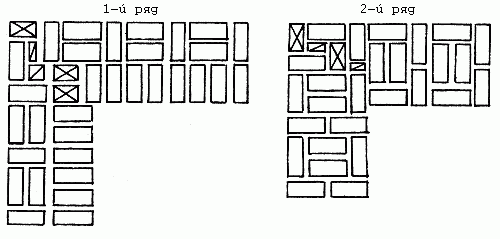
Перед тем как переходить к кладке стен, необходимо выложить несколько рядов кирпича на углах.
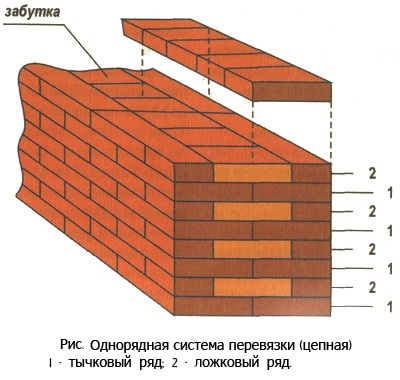
Кладка стен
В зависимости от того, какая схема кладки и перевязки кирпича была выбрана для возведения углов бани, производится кладка и самих стен. Перевязку кирпича рекомендуется осуществлять однорядной либо многорядной системой перевязки, что зависит от размеров постройки, а так же наличия 2-го этажа.
-
- Колодцевая кладка кирпича
-

- Схема кладки стен из кирпича
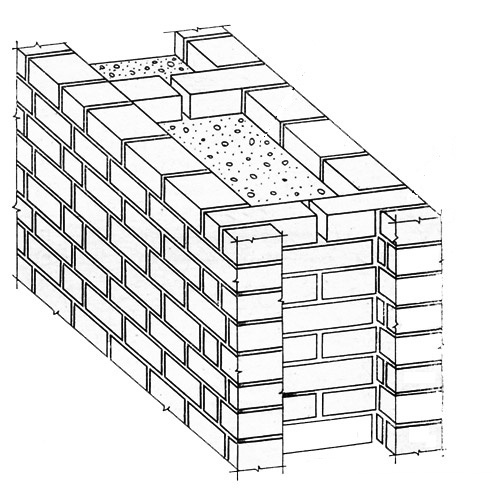
Следует отметить, что во время кладки стен бани так же определяется вариант утепления стен. Это может быть последующее утепление стен бани минеральной ватой, либо создание в стенах пустого пространства (около 6 см), которое либо заполняется керамзитом, либо просто воздухом.
Обращаем ваше внимание на то, что кладка первого ряда стен бани должна осуществляться из цельного кирпича. В кладке последующих рядов разрешается применять кирпичи со сколами либо половинки (четвертинки) кирпичей, главное укладывать их с внутренней стороны стены.
Так же важным моментом, как при кладке стен, так и при кладке углов бани является толщина и плотность швов. Долговечность и эстетическая привлекательность кирпичной бани будет зависеть от того, насколько одинаковые швы будут по всей длине стены, а так же какая толщина швов применялась. Плохо повлияет на прочность постройки слишком тонкие, либо слишком толстые швы, поэтому рекомендуется создавать толщину шва в пределах 10-12 мм.
Ну и последний из главных нюансов кладки кирпичных стен бани – создание оконных и дверных проемов. Во время кладки кирпича необходимо согласно проекту оставлять соответствующие проемы. Так же в боковых поверхностях проемов необходимо установить по две деревянные пробки, которые должны быть аналогичны размерам кирпича и дополнительно заизолированы рубероидом. Окна и двери рекомендуется вставлять на этапе кладки стен, когда будет полностью создан соответствующий проем. Над оконными и дверными проемами обязательно необходимо устанавливать перемычки, как показано на фото:

Оконная перемычка
Создание потолка
Когда кирпичный короб бани будет полностью возведен, необходимо перейти к созданию потолочного перекрытия. Так как несущие стены бани являются прочными, разрешается создавать чердачное отделение либо второй этаж, поэтому конструкция потолка должна быть прочной. О том, как правильно сделать потолок в бане читайте в данной статье.
Создание крыши

Конструкция крыши бани
Создание крыши кирпичной бани не представляет сложного мероприятия. Изначально необходимо с помощью анкеров закрепить на стенах мауэрлат. К мауэрлату в дальнейшем фиксируется стропильная система, поверх которой монтируется деревянная обрешетка и кровельный материал. Более подробно изучить технологию возведения крыши бани вы можете в данной статье.
Утепление, паро- и гидроизоляция бани

Утепление стен бани снаружи
С технологией утепления, паро- и гидроизоляции бани вы поэтапно знакомились, изучая процесс возведения, стен, потолка и крыши бани. В соответствующих статьях подробно рассмотрены материалы для утепления короба бани, защиты от влаги, а так же предотвращении утечки тепла с парилки.
Отделка бани

Отделка бани вагонкой
Как только баня будет полностью построена, необходимо произвести финальную отделку изнутри и снаружи. Что бы сделать интерьер бани привлекательным, рекомендуется использовать для внутренней обшивки помещения доску вагонку. Данный материал подчеркивает интерьер русской бани, легко монтируется и обладает целебными свойствами. Об остальных преимуществах вагонки, а так же правилах ее выбора читайте в данной статье.
Внешняя отделка кирпичной бани может быть весьма разнообразной. Хорошо подходит для внешней отделки конструкции оштукатуривание стен, монтаж сайдинговой доски либо монтаж все той же вагонки.
Советы по строительству бани из кирпича
Помимо предоставленной выше технологии строительства кирпичной бани, хотелось бы обратить внимание на несколько очень важных нюансов, а точнее советов:
- Для строительства кирпичной бани используйте красный кирпич
- Для того что бы расколоть кирпич на две либо четыре части используйте молоток-кирочку
- При проектировке бани размеры стен создавайте кратными размерам кирпича. К примеру, если кирпич размерами 240*120*65 мм, размер стены должен быть кратен 75 мм, а если кирпич размерами 240*120*88, размер стены должен быть кратен 100 мм.
- Кладку рядов осуществляйте, ориентируясь на шнур-причалку, который натягивается на каждом ряду и фиксируется на гвозди, вбиваемые в горизонтальные швы.

Кладка ряда по шнуру-причалке
- Обязательно следите за горизонтальностью и вертикальностью кладки, используя строительный уровень.
- Ни в коем случае не используйте кирпич с дефектами для кладки углов, перегородок, а так же несущих колонн.
- Если вы используете для строительства кирпичной бани глиняный кирпич, обязательно предварительно смочите его в воде.
- Обрабатывайте швы между рядами специальным инструментом – расшивкой. Обработка должна производиться сначала вертикальных швов, а после этого горизонтальных.
- В парилке кирпичной бани рекомендуется осуществлять кладку кирпичной печи, на этапе строительства стен.
- Так же на этапе строительства бани необходимо сразу же продумать и осуществить установку дымоходной трубы (если в дальнейшем будет использовать электрическая печь, дымоход не нужен).
- От того, насколько качественно будет осуществлена паро-, тепло- и гидроизоляция, будет зависеть время нагрева/остывания бани, а так же расход топлива на данное мероприятие.
Это минимум тех знаний, которые вы должны иметь при строительстве бани из кирпича своими руками. Обращаем ваше внимание на то, что данное мероприятие лучше передать в руки специалистов, т.к. ремонт некачественно построенной бани обойдется на много дороже.
Также рекомендуется перед строительством кирпичной бани потренироваться на менее сложной постройке, к примеру, хозблоке либо беседке из кирпича. В этом случае вы набьете руку и будете более подготовлены к существующим проблемам, связанным с кладкой кирпича.
Видео-урок строительства бани из кирпича
Что бы вы наглядно увидели, из каких этапов состоит строительство кирпичной бани, предоставляем вашему вниманию наглядный видео-урок данного мероприятия:
Рекомендуем так же ознакомиться со статьей: строительство бани из бруса своими руками!